|
|
Dust - Eliminating - Video - Apparatus
Posted June 2004
Printable Version
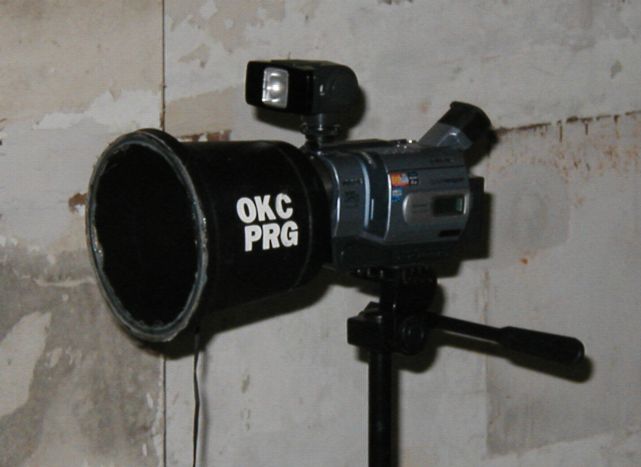
Conceived by Jeff Davis, and designed and built by Erik Smith of the OKCGC, and Becky and Ron Cosgrove of the OKCPRG, DEVA (Dust Eliminating Video Apparatus) effectively removes ~99% out-of-focus dust contamination from night shot video. Since creating and using DEVA filters on all video systems, the apparent flying "orb" phenomena literally stopped happening, which leads us to believe that all "orb" phenomena is simply due to close contaminants such as dust.
You can build your own DEVA with these instructions and a few inexpensive parts from your local hardware store (part numbers shown here are from Home Depot). DEVA should fit almost all Sony Nightshot video cameras, and when used correctly, filter out almost all close contaminants that create false positive video anomalies.
| Parts Needed |
| Description |
Home Depot Part # |
| 6" DC Planter (6" Flower Pot) |
B112-348 |
| Household Goop Tube (Glue) |
C974-110 |
| 2" No Hub Coupling |
C190-225 (Plumbing Department) |
| 8"x10"x.093" Lexon XL Sheet (Plexiglass) |
D987-295 |
| Flat Black Paint |
Any Brand (Krylon works well) |
| Tools Needed |
| 2" Hole Cutting Drill Bit (used to drill door knob holes) |
| Power Drill for Drill Bit |
| Dremel, Rotozip, or equivalent (for cutting plexiglass) |
| Fine sand paper or a file |
|
Procedure
1. If you choose to paint the outside of your DEVA (for cosmetic purposes), spray paint the exterior of the flowerpot and seal it with an acrylic clear coat now. It is a good idea to paint the inside of your DEVA with flat black paint as well. This will keep internal reflections down, and keep stray light from leaking through the plastic and contaminating your video. Use a flat black paint (Krylon Ultra-Flat works well), and paint the inside of the flower pot with several even coats. When you hold the flower pot up to the light, you should not be able to see any light leaking through the plastic.
2. Use the 2" Hole Cutting drill bit to carefully drill a hole in the bottom of the flowerpot, slightly off centered, and use a utility knife to clean up the edges. Tighten the metal clamps on one end of the 2" Coupling until the diameter is small enough to fit into the hole you just cut. Place a bead of glue around the inside of the hole you just cut and slide the 2" Coupling inside the flowerpot about half way. Now, expand the metal clamps, and the coupling should make a snug fit in the hole. Run another bead of glue on the outside of the flowerpot against the coupling and on the inside of the flowerpot against the coupling to seal the coupling-flowerpot joint entirely from air and dust flow. Allow this joint to dry for several hours before proceeding.
3. Trace the top (big opening) of the flowerpot on the plexiglass. Carefully, with either a Rotozip, Dremel, or similar tool cut the traced pattern out (leave the protective film covering on the plexiglass while cutting to prevent scratching the plexiglass lens). Once this is done clean up the edges of the round plexiglass lens with fine sandpaper or a file.
4. Run a bead of glue around the top edge of the flowerpot (you may want to sand or file off the paint in this area to make the glue hold better), remove the protective film from the plexiglass and carefully lay the plexiglass circle on the flowerpot's large opening. Press down and make sure you have a good seal between the plexiglass and the flowerpot with the glue. Wipe any excess glue that seeps from the edges of the joint, and leave your DEVA to dry in a well ventilated area for at least 48 hours before using. The paint and glue will not fully cure for several weeks, so be extremely careful with your DEVA! Also, be careful not to scratch the plexiglass lens, as any scratch will be visible on your video recordings.
|
|
Using your DEVA
Slide the protruding 2" Coupling over the lens of the video camera CAREFULLY, and tighten the metal clamp until there is a good seal between the DEVA and the camera lens. Turn off, or block your internal infrared (IR) light (THIS IS ESSENTIAL!). Most Sony Digital Nighshots have detachable hotshoe IR's that can simply be turned off, but on Hi-8 and other models, you may have to engineer some way to either turn off your video camera's IR light, or block it completely. Remember: infrared light can pass through materials that may look opaque to the human eye, so if you have to block your IR, test different materials until you find one that works well. Point your video camera at a mirror, and look through the viewfinder in NightShot mode - you shouldn't be able to any light coming from your video camera's internal IR.
Once you get DEVA secured and your internal IR light either turned off or blocked, you must now find another source of infrared lighting. You can either "piggy-back" off another video camera's IR light, or use an IR Extender (available from Sony, model HVL-IRC, these are self-contained IR sources, mountable on any tripod). You MUST place the IR extender or pickybacking camera at LEAST three feet to the side of your DEVA-equipped video camera, and aim it to illuminate the area your camera is pointed at.
When using DEVA, remoting the infrared light source is the key to eliminating all dust contamination - because reflections off contaminants will not be directed back into the camera lens. Read "The Truth About Orbs" for more information on close contaminants in photography and video. Congratulations, you are done, and ready to enjoy hundreds of hours of contaminant-free video!
|
<- Back to Main How-To Page
Disclaimer
Disclaimer: The author(s) of these articles, inventors, host(s) and sponsor(s) of this site are not responsible in any way for damages, direct or indirect, resulting from your performing, attempting to perform, or inability to perform, the construction and/or modifications described here. If you follow the instructions on this website carefully, your project should be successful, but we are not responsible for any damages done as the result of building this project!
Though the building/modification instructions are offered free of cost to the public on this website, the author/designer/inventors of this procedure and devices still retain all copyrights on the projects featured here. In other words, just because you built it doesn't mean you invented it! We offer you these projects as a way to improve your own research, and share with the world the knowledge we have been so fortunate to obtain at our research sites. The only thing we ask in return is to give the appropriate inventors credit when asked who came up with the idea.
Text and banner links, and donations are always greatly appreciated and welcomed. By reading these how-to pages, and attempting these projects you automatically agree to this disclaimer. We hope you find good use for this information, and good luck with your projects!
|
|